Many WordPress users are experiencing a fatal error after installing the Yoast update. The good news is that there is a fix, and we will show you how to implement it in this article.
What Is Yoast?
Yoast is a plugin that is used to help improve the SEO of WordPress websites. It adds a number of features, including a content analysis tool, that can help you optimize your website for search engines. However, the recent update seems to be causing a fatal error for many users.
What Is Causing The Error?
According to The Search Engine Journal, the cause of this error has to do with a conflict with plugins that change the URL of the login screen. Yoast released a patch within 2 hours of releasing the update, but that may not solve the issue right away for all users. If your WordPress site is in a fatal error state due to the conflict there are still steps you can take to solve it.
Solving the Error
Back-Up the Site
First, make sure you have a server-level backup of your site. Ideally, you are working with a host that automatically backs up your site every day, so you should already have this. If not, make a backup now.
If your host isn’t running daily backups, or worse, doesn’t even offer server-level backups, it’s time to consider changing hosts. Shameless plug – our concierge-managed WordPress hosting offers daily automatic backups, done-for-you free migrations, and much more. Of course, there are plenty of great hosts out there, so shop around.
Deactivate Yoast
If your site is in a fatal error state that prevents you from managing plugins through the standard plugin screen, log into your file manager (this might be in cPanel, or you might have SFTP access) and navigate to where your WordPress install begins. You will know you’re in the WordPress root directory when you see a file named wp-config.php.
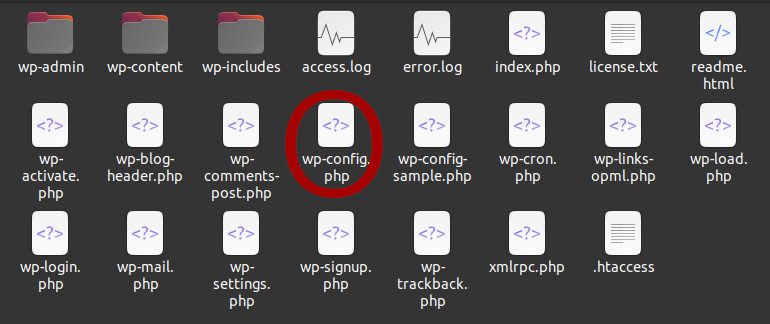
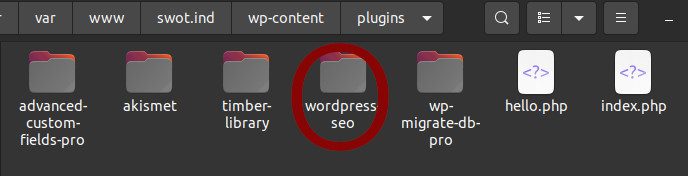
From the WordPress root directory go to wp-content/plugins where you will see a list of directories (file folders) representing at least most of the plugins on your site. From here change the directory named “wordpress-seo” to anything else. I like to use “wordpress-seo-off” so I know what it was and can tell that I turned it off manually. This will deactivate the plugin and enable you to access the dashboard where you can take the next steps.
Replace Yoast 19.7
Now that you have access to the WordPress admin again you can navigate to the plugins screen and delete Yoast. Since there’s an update available you should be able to simply click “add new” in the plugins screen and install Yoast again, but this time it will be 19.7.1 or higher, which will include the fix.
Now, this is the third time this year that Yoast has encountered a fatal conflict with other plugins. It’s difficult to test against every potential combination, but the downtime caused can also cost a lot of money or cause a poor user experience. Another alternative to installing the updated patch might be to install a different SEO plugin. Smartcrawl Pro by WPMU Dev is our preferred option, but there are other tools out there as well.
Get Help If You Need It
If you are not comfortable making these changes, or if you are still having issues after following the steps outlined in this article, please reach out to our team for assistance. We would be happy to help you get your site up and running again.
And that’s it! You’re now ready to get back to refining your digital presence and serving your users. Thanks for reading, and feel free to reach out to us if you need any help.